

Stringwalking may sound like a difficult technique, but at the end of the day, it is no harder and can be more accurate than gap shooting.
The Basics
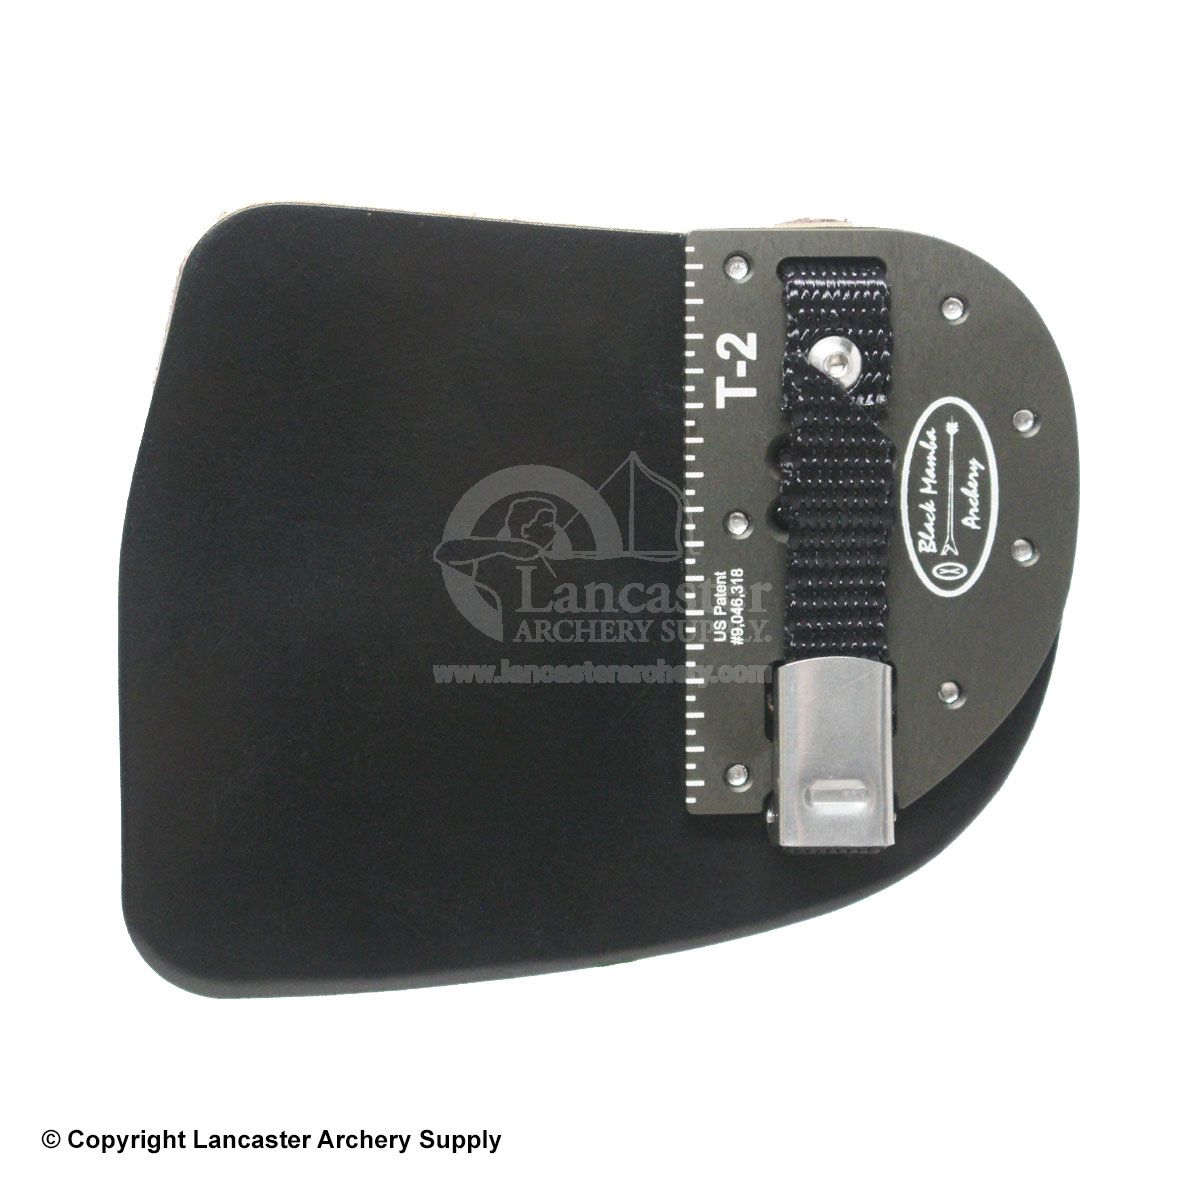
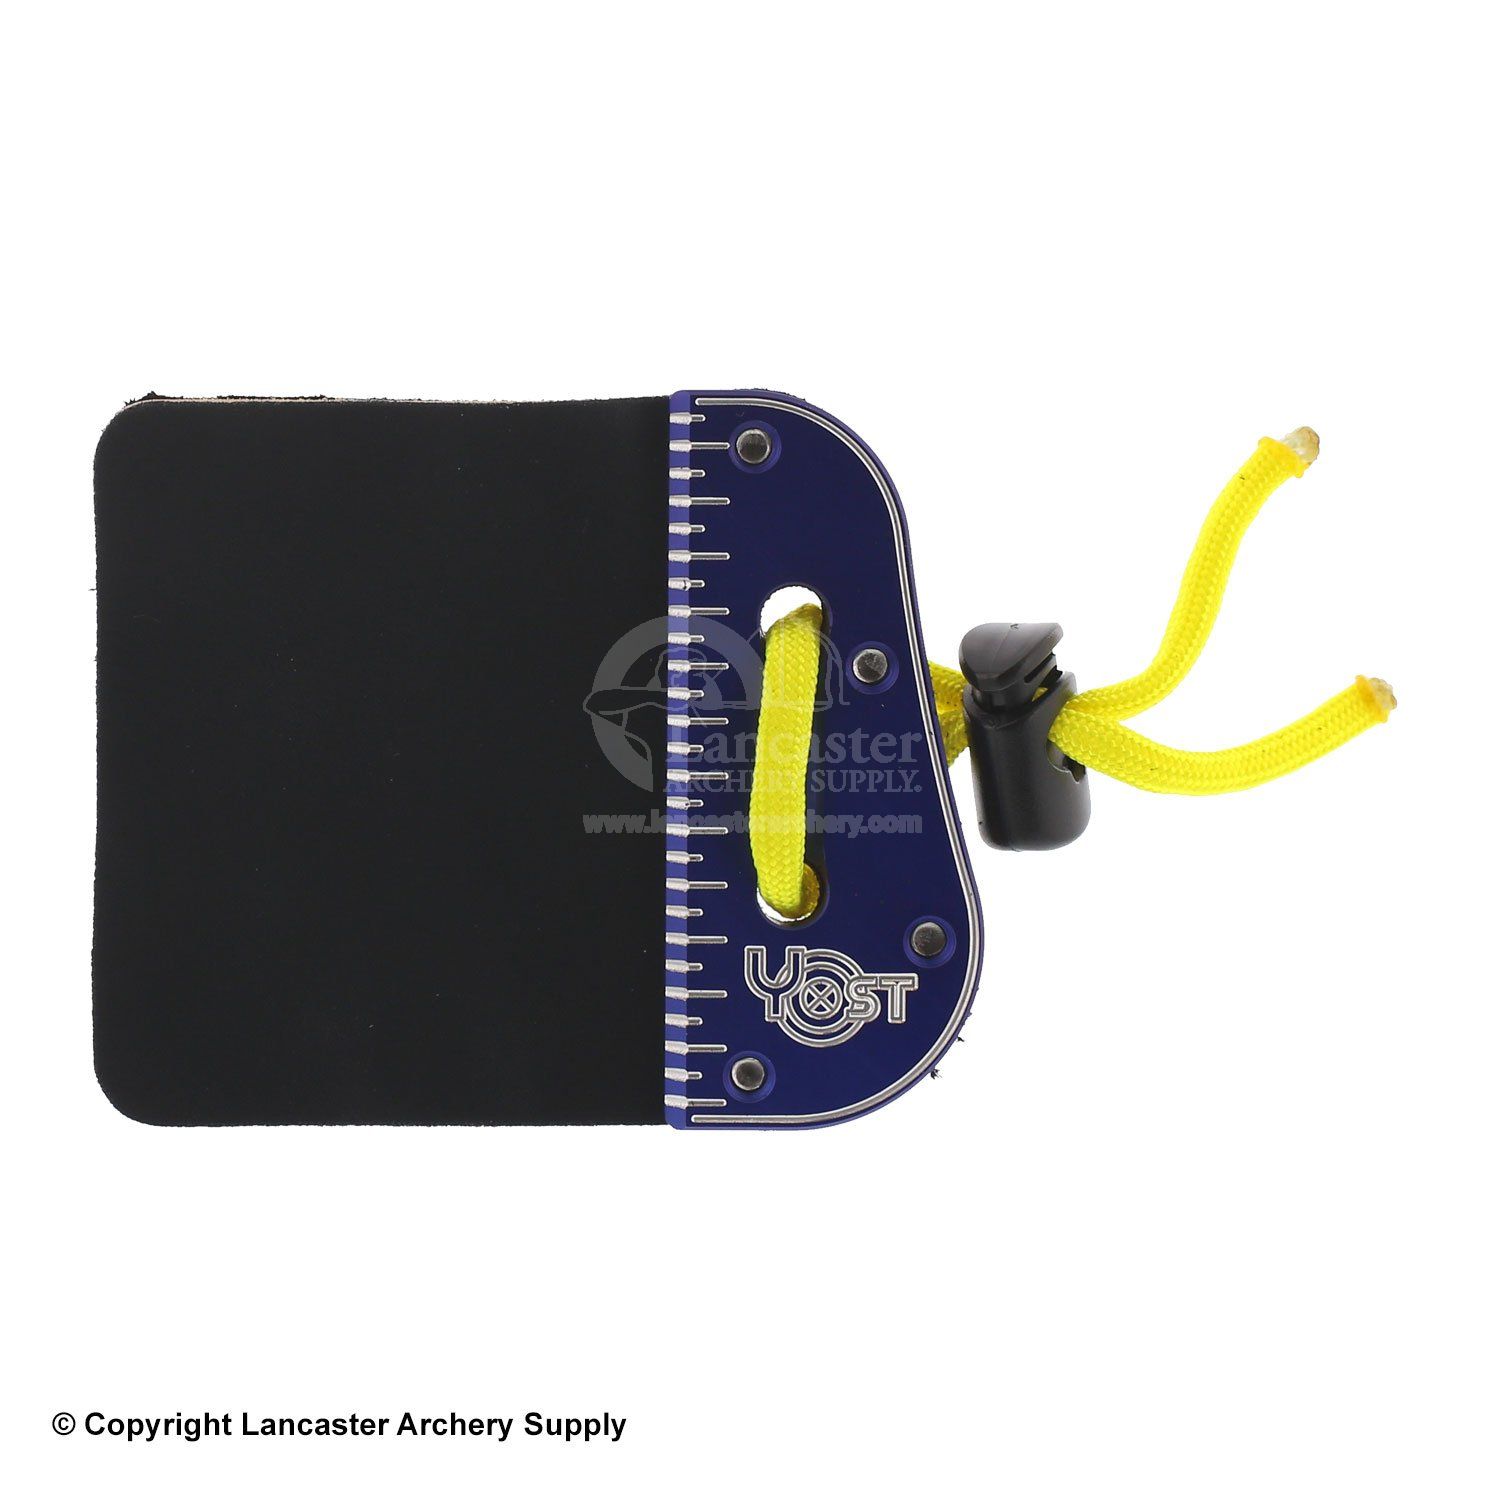
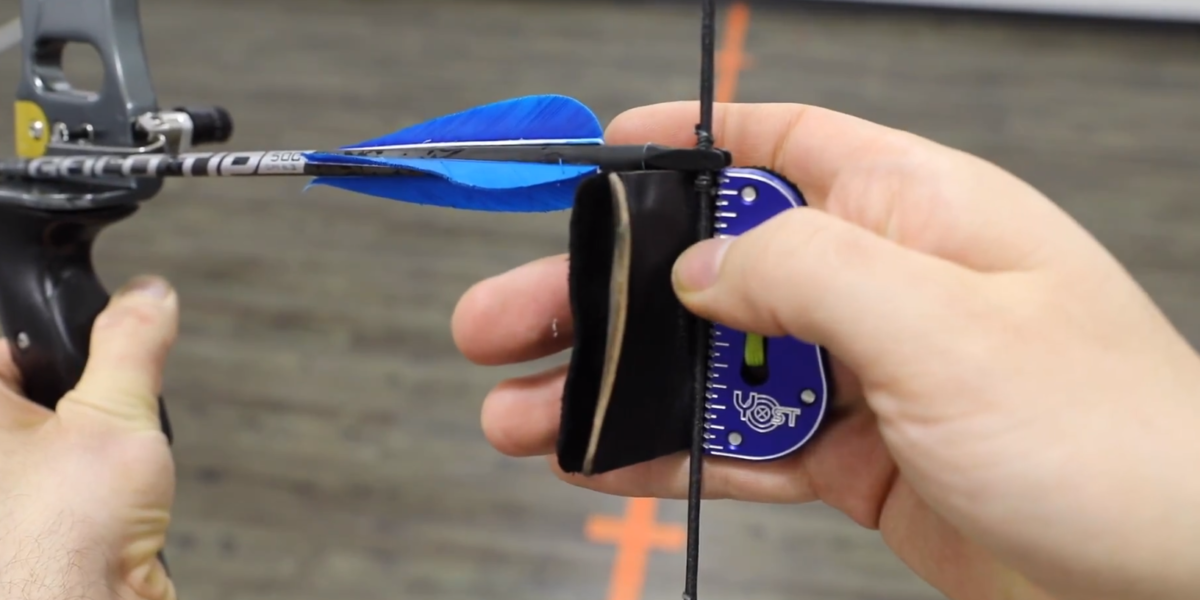
When stringwalking, a barebow archer keeps the point of the arrow directly on the gold at any distance, unlike gap shooting. In order to actually hit gold, we move our fingers down the string, away from the nock of the arrow and pull from different places on the string to shoot at different distances. The farther our fingers are to the nocking point, the flatter the launch angle of the arrow becomes, therefore it will hit lower, corresponding to a shorter flight distance. Many stringwalkers use pre-marked 3-under finger tabs in order to crawl down the string, these are tabs with marks or stitches along the plate that are evenly spaced and uniform in size, shape and color. Some examples are the Yost tab and the Black Mamba T-2 tab.
Fixed Distances
For college archers, the most common distances to shoot are 18, 30, and 50 meters, so by some trial and error, we can find out our crawls for those specific distances.
Many barebow tabs, such as the Yost or Black Mamba T-2 include lines etched in the metal of the tab. Some leather tabs will include stitching which is evenly spaced. In order to measure a crawl, position the top of the tab against the nock, and then count the marks or stitches down the tab to your crawl distance down the string. It might be helpful to place your thumb against where you are going to pull, and then move your tab to where your thumb is pointing and pull back the string from there. This process ensures accurate and repeatable crawls. If you don’t have a marked tab, you can place tape on your string when finding your crawls or add your own marks to your tab, as long as they are “uniform in size, shape and colour.” (WA barebow rules, https://worldarchery.org/rulebook/article/3138, 22.3.8.1.)
Remember the crawls for the corresponding distances and always pull from these places. Some archers call this the “Fixed Crawl” technique because you crawl down a fixed distance on the string for every shot. Because it is not allowed to mark your tab by yourself to identify the distance each crawl corresponds to, it is helpful to record the crawls for different distances on a notebook.
Field Shooting
Field archery involves shooting at distances anywhere from 10m to 50m. Many experienced archers map the crawl against distance so that they can calculate the crawl for any distance. If you want to methodically map your crawls, you need to find your point-on distance. This refers to the specific distance away from the target where shooting with your fingers adjacent to the nock and aiming the tip of the arrow on the gold will result in the arrow hitting the gold. This is the maximum distance you can hit while using the stringwalking method. A good distance to start when testing is between 40-50 meters. Find a clear range, inform anyone you might be shooting with, and start testing these ranges, walking closer or farther from the target if the arrow strikes low or high, respectively.
Once you’ve found your point-on distance, you can start to map your closer crawls such as 10m, 20m, 30m, etc. Walk closer and closer to the target, recording the range and crawl distance as you go. Remember, the tip of the arrow should always be on the gold while the fingers crawl up and down the string to account for the shooting distance. Plot the crawl distance against shooting distance, and the data points connect the data points with a straight line. That is, crawl distance should change linearly with respect to shooting distance.
Tuning for Crawls
Different crawls take different tuning. Longer crawls induce more unbalanced forces on the upper and bottom limbs. When positioning your fingers just underneath the arrow, the forces on the two limbs are nearly equivalent. But as we crawl down the string, more and more force is put on the lower limb. If not properly tuned, the limbs will move forward out of sync when the shot is released. In order to even out this force, it might be helpful to have a negative tiller for longer crawls. This means turning the lower tiller bolt out or the upper bolt in so that the tiller, the distance from the base of the limb to the string, is greater on the lower limb than the upper limb. This is a process of trial and error, but in general, a proper tiller will be quieter, the limbs will flutter less after the shot, and the top of the bow will kick back less.
For longer crawls, less force is being imparted into the arrow. Because of this, an arrow that is too weak at your point-on may appear stiffer at longer crawls. Knowing how much to adjust the plunger stiffness for each crawl distance is important.
Regardless of tuning, we should try to reduce the crawl. Having a smaller crawl means you are pulling the string back closer to the center and tend to give more consistent results.
What Changes Crawls?
Many factors can influence your crawls. The biggest, and easiest change to make, is your anchor point since this also affects the launch angle of your arrows. When shooting with an Olympic Recurve anchor, under the chin, your point on distance will be much farther away, because of the steep launch angle of the arrow. If you look at most competitive barebow archers, such as John Demmer, Rick Stonebraker, and Michael Fisher, you’ll see that they tend to have much higher anchors. Their anchors are usually located somewhere on the side of the face, referencing the corner of the mouth or the cheekbone, for example. By anchoring higher, the point on distance is reduced, and the finger crawls will be shorter at closer shooting distances.

The arrow and bow combination also highly influences crawl lengths. Longer arrows have tips that are farther away, essentially extending your “sight”, and would therefore reduce crawl lengths. Heavier arrows drop off faster, leading to a shorter point-on distance. The same reason holds for a weaker bow. In addition, the arrow points lower with a higher nocking point points than a lower nocking point, this will reduce the crawl needed.
Because the tune of your bow changes for every crawl, keep detailed notes on the tiller, plunger stiffness, nocking point height, and brace height that gives the best tune for each distance. When preparing for a competition, make sure you are tuned for the distance being shot. For indoor, your crawl will be longer, so you will likely have a more negative tiller and a weaker plunger spring. The opposite goes for outdoor. If you ever shoot field, where you are shooting at many targets at variable distances, tune for your average crawl, likely for 30-40 meters, and hope for the best.
In summary, a higher anchor, longer and heavier arrow, weaker bow, higher nocking point will reduce the crawl needed for any distance. For target competitions with fixed distances, tune for that distance. For field competitions with varying distances, tune for the average distance.
Other Resources
For any barebow archer, we highly recommend The Push – A Traditional Archery Film. It is a comprehensive look at what makes traditional and barebow archery how it is, and covers everything from equipment to aiming and form. If you want to skip to the section on aiming, you can skip to 40:00 for a great visual and explanation on gap shooting and stringwalking. Finding the crawl for a specific distance is covered at 01:05:40. Bareshaft tuning is covered at 01:28:00.
Notes
- It might be helpful to have both a top and a bottom nocking point to hold the arrow in place at full draw.
- A trick is to carve into the serving a little with your nail to identify where you pull from for a certain distance

Marks on the string are not allowed in WA barebow, the advice to carve into the serving could get an archer disqualified.
LikeLike